A walkthrough to build a simple tags input component in React – there’s probably a thousand of these tutorial on the internet already but I had to do one of these recently for… something so you will benefit/suffer with one more of these on the web.
Link to final solution: https://codepen.io/jerrylow/pen/mvZZpp
Edit: I’ve moved the <input> into the list of tags to ensure that the input always stays inline with the list of tags when possible. Some of the screenshot might not reflect this.
Edit 2: Since React 16 Hooks has been more widely use and writing reusable code a lot easier. Here’s this tutorial written as a function component https://codepen.io/jerrylow/pen/RwWbgPx. I won’t break it down line by line since most of the code and logic is still the same. I’ve commented on where the state hook is used.
Getting Started
I’m not going to start from setting up your local, creating a React app and all that I assume that you’ve setup React before and we’re going to start with the component. For the purpose of this example I’m going to render the component directly in ReactDOM:
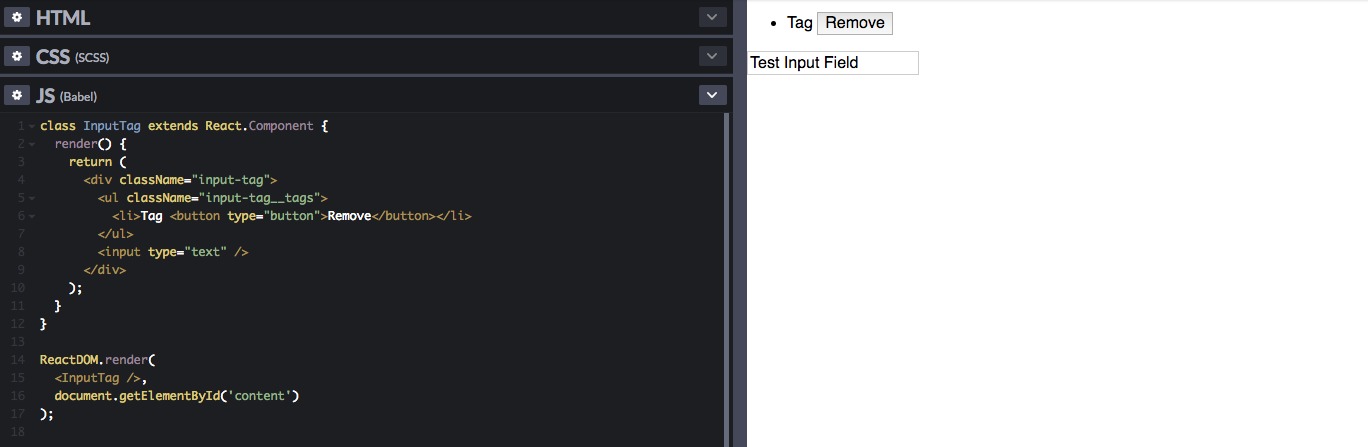
What I have setup is on a single file:
Ideally you’ll have InputTag in it’s own component file and it’ll get imported into a part of your application:
Setting Up the DOM
When I start writing a component I usually structure the DOM first since I have a general idea of where elements will be. Create a rough structure and add all of the placeholder content in too so that you can see things are structurally working.
Removing the comments and placing them in the component:
Now there’s two things you can do at this point:
- Style the component to look better or,
- Add functionality to make things work.
I am a visual person and I usually like to tackle easier tasks first so at this point I would usually style the component, but I know the added functionality could impact the styles; thus, most developers would flush out most of the functionality first — for the sake of this article I will take this route — also because I won’t actually cover the styles in this article.
Make the Input Field Work
The first logical functionality to tackle is to add tags from the input field. We will store tags in the component’s state so we’ll setup the default tag state (an empty array) in the constructor.
This will go in the top of your component:
If you’re not familiar with component state check this out https://reactjs.org/docs/faq-state.html
To add tags I’m going to listen for when the user hits Enter when they’re focused on the input field. To do so we can use either add onKeyUp or onKeyDown to the field. I’ll use onKeyDown.
Now I’m calling for a function call inputKeyDown that at this point we haven’t written yet — let’s get to work.
Line by Line Breakdown
inputKeyDown = (e) => {Create a function called inputKeyDown using the arrow function so it lexically binds this to the function. We only need to do this to access this so you don’t necessarily need to create all your function as an arrow function. From onKeyDown it will pass the event as the first argument to our function which I’ve just named e.
const val = e.target.value;I’m assigning the input value to val.
if (e.key === 'Enter' && val) {Check if the keystroke the user hit was indeed Enter and only add the tag if the user actually inputted a value in the field.
this.setState({ tags: [...this.state.tags, val]});Add the value to the component’s state tags with this.setState(). What I’m doing here is assigning tags with a value of [...this.state.tags, val], this is an array [] first spreading the current list of tags that’s already in state ...this.state.tags then adding the new val at the end. If we had simply assigned tags’ value like { tags: val } we would’ve overwritten all the tags with just a single value.
Check That It’s Working
At this point there’s no output of the tags so you can test that the functionality is working by console.log outputting this.state.tags or you can use React Devtools to monitor your props and state (recommended).

Clearing the Input Field
As you see from above, after adding a tag the value remains in the field, which is not ideal. To clear the field we need to set the input’s value to null. In order to do this we need to be able to reference the input field, we can do this by referencing the DOM. On the input field we add ref={c => { this.tagInput = c}}. I’m naming this input as tagInput.
Now we can clear the value after it’s added to state.

Displaying the Tags
Before we add the functionality to remove tags we should display the tags. We can now replace the placeholder <li> tag with real tags. To do this we’ll use .map to loop through the tags and output them:
Each tag is looped as tag. I’m also adding the index (i) that’ll be used later. Note I’m using the tag as the key for now. If you don’t know why you need keys read this, it’s partly what makes React awesome — don’t use the index as the key. Now keys need to be unique and using the tag as the key could cause duplication error, but this is good since we also don’t need/want duplicated tags — we can restrict that. We’ll add a check before tags are pushed into state.
Now test again and the tags should be outputted:

Removing Tags
The functionality left is to remove tags. We’ll create a function that remove the tags.
Line By Line Breakdown
removeTag = (i) => {I won’t talk about the arrow function because we did that last time. What I’m going to use to indicate which tag to remove is the index. If you do any sorting or re-ordering of you tags this won’t work but for my example it will :P
const newTags = [ ...this.state.tags ];We don’t want to directly mutate component state so what we do is create a new array spreading the current tags so we can remove tags. Note: this is not the same as setting const newTags = this.state.tags.
newTags.splice(i, 1);Now we remove the tag from the array.
this.setState({ tags: newTags });Store the new list of tags back into state.
Call the Remove Function
Now we can use the function by adding onClick to the remove button(s).
Add some tags, click remove and check that they’re working.

Adding Backspace Remove
Another method to remove tags is to have the ability to press backspace when the user is focused on the input and there’s no value to remove the last tag. We can easily achieve this by adding an else if condition in inputKeyDown.
This calls this.removeTag and the index will just be the last item in the array. Here it is in the whole function:

Style It Up!
Now, I don’t want to go into the styling part as everybody might might want to make their component look different and really that’s not the focus of this article. Take a look at the final code for styling guidance. The recommendation is to use flex to display tags and the input inline.
Final Solution

Link to final solution: https://codepen.io/jerrylow/pen/mvZZpp